Wednesday, February 06, 2013

Model View Presenter with JSP Pages

I recently worked on a simple admin web page that was plain old JSP. It got me thinking about how you would implement MVP in this world. Here's an example "application" to illustrate:

In ASP.NET, the page would simply play the view role by implementing the view interface (eg. ICalculatorView) in the code-behind partial class. The challenge with JSP pages is that they cannot implement interfaces.

Just for fun, I played around with this example JSP and found a way to apply the pattern. At the top of the JSP, we have a tiny bit of glue code to wire up MVP and let the presenter do its work:

 <%  
     CalculatorPresenter presenter = new CalculatorPresenter(new JspView(request));  
     if (request.getMethod().equalsIgnoreCase("post"))  
         presenter.addNumbers();  
 %>  

The presenter asks the view for inputs from the UI, calls on the model (some kind of application/domain service in this case), and passes the answer back to the view:

 public class CalculatorPresenter {  
     private final CalculatorView view;  
     private final CalculatorService service;  
     // ...  
     public void addNumbers() {  
         int x = view.getX();  
         int y = view.getY();  
         int result = service.add(x, y);  
         view.displayResult(x, y, result);  
         view.displaySuccess("Successfully added!");  
     }  
 }  

As expected, the presenter only handles presentation logic. It leaves the number crunching to the model, and lets the view handle the actual UI bits.

In this case, the view role is played by an inner class of the JSP, which you can declare somewhere inside the JSP (I put mine at the bottom of the JSP file):

 <%!  
     private String xTextField;  
     private String yTextField;  
     private String resultLabel;  
     private String successLabel;  
     private class JspView implements CalculatorView {  
         private final ServletRequest request;  
         // ...  
         public int getX() {  
             return Integer.parseInt(request.getParameter("x"));  
         }  
         public void setX(int value) {  
             xTextField = String.valueOf(value);  
         }  
         // ...  
         public void displayResult(int x, int y, int result) {  
             setX(x);  
             setY(y);  
             resultLabel = String.valueOf(result);  
         }  
         public void displaySuccess(String message) {  
             successLabel = message;  
         }  
     }  
 %>  

The String fields are just for storing data that the JSP will pick up and display (I'm sure there're better ways, but I wanted to keep it simple for this spike):

         <% if (resultLabel != null) { %>  
             <p class="result">Result = <%= resultLabel %></p>  
         <% } %>  

Why Figure This Out?

I just saw it as an interesting problem to solve, especially after reading a forum discussion that suggested it couldn't be done. I also have fond memories of how the MVP pattern allowed us to do subcutaneous automated acceptance testing on a large enterprise ASP.NET application I contributed to some years ago, so I wanted to see if the same pattern could be applied elsewhere.

Thanks to Code Formatter for helping me style the code snippets for Blogger!

Monday, April 09, 2012

Restore display to console after Windows Remote Desktop session

On a recent project, we were given a Windows computer hooked up to a big screen TV to use as a highly-visible build-status/metrics radiator display. The keyboard and mouse were intentionally removed so that passers-by can't easily mess with the display.

To make changes to how things looked, we simply used Windows Remote Desktop (mstsc) to log in. However, when you disconnect, the TV screen remains in the locked state. This isn't what we wanted - we wanted the screen to show what we saw in our Remote Desktop session.

A web search revealed how to accomplish this, but I thought I'd post quick instructions here for reference (for Windows 7):
  1. Identify your session ID
    1. I find it's just as easy to bring up the Task Manager (shortcut: Ctrl-Shift-Esc), look at the Users tab, and identify your ID (let's say it is ID 2).
  2. Create a batch file (eg. restore-console-display.bat) with the contents:
    tscon.exe 2 /dest:console /v
  3. Basically, you want to run this as Administrator each time to restore the display back to the console. I simply placed a shortcut to this batch file in my Start menu, then made it request admin priviledges when it runs:
    1. Properties (of the shortcut)
    2. Advanced (button on the Shortcut tab)
    3. Run as administrator (checkbox)
Side-note: A Windows machine may not be your first choice for a build radiator display, but in many Windows-based corporate environments, such a workstation may be the quickest asset to procure.

Saturday, March 31, 2012

Purpose-Specific Visitors

This is a follow-up to my "Why visitor pattern is worth the overhead" entry. I'll be referring to the example in that entry...

One thing that's bothered me about the Visitor pattern is the syntax it introduces. In the example, our core domain is the concept of Feedback. On a Feedback object, you would expect to see methods/operations related to that problem domain.

However, if you implement the "textbook" Visitor pattern, you end up with:

// C# pseudocode...

abstract class Feedback
{
    void Accept(IFeedbackVisitor visitor);

    // Other domain meaningful methods
}

The 'accept' method is questionable. In the best case scenario, the word is meaningless to the domain, and we simply dismiss it as an annoying requirement of the pattern. In the worst case scenario, the word is meaningful to the domain but is a completely unrelated concept. So in this example, we could be misled to think that this method helps us accept or receive feedback from a user.

Let's express our true intention:

abstract class Feedback
{
    void DescribeTo(IFeedbackRenderer renderer);

    // Other domain meaningful methods
}

class StandardChoiceFeedback : Feedback
{
    int code;
    string description;
    void DescribeTo(IFeedbackRenderer renderer) { renderer.Render(description); }
}

class FreeFormFeedback : Feedback
{
    string text;
    void DescribeTo(IFeedbackRenderer renderer) { renderer.Render(text); }
}

class FollowUpCallFeedback : Feedback
{
    PhoneNumber phoneNumber;
    void DescribeTo(IFeedbackRenderer renderer) { renderer.Render(phoneNumber); }
}

// *******************************

interface IFeedbackRenderer
{
    void Render(String text);
    void Render(PhoneNumber phoneNumber);
}

Now, the purpose of the visitor is clear - we're getting a Feedback object to describe itself to another object that will help render it for display purposes.

I actually went one step further with this. Following "textbook" Visitor would have given us:

interface IFeedbackRenderer
{
    void Render(StandardChoiceFeedback feedback);
    void Render(FreeFormFeedback feedback);
    void Render(FollowUpCallFeedback feedback);
}

That's fine too. What I've done instead, is 'inline' the visitor methods to reflect what a Renderer would really need to do its rendering. An interesting effect with this approach is that the internals of each type of Feedback stay unexposed - no getters are required to make this work.

Tuesday, March 25, 2008

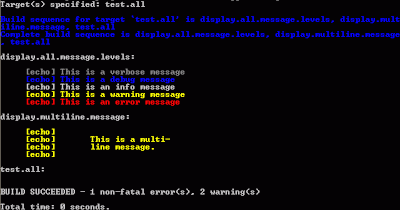
Colorized NAnt Console Output


If you use NAnt for your build scripts, colored console output may be helpful in quickly spotting warnings or errors. I recently wrote a logger to do that:
  1. Download the source for the version of NAnt you're using (I tested this against NAnt 0.85).
  2. Apply this patch to the source tree. If you're on Windows, I believe you can use 'patch.exe' which comes with UnxUtils.
  3. Build NAnt by following the instructions in 'README.txt'. This will produce a bunch of files, but the only one we're interested in is 'NAnt.Core.dll'.
  4. In the directory where you store your NAnt binaries (eg. on my current project, it's in MyCurrentProject/tools/nant), replace 'NAnt.Core.dll' with the new one.
  5. The last step is to add an option to your 'nant' call to specify the use of the new logger:
    nant -logger:NAnt.Core.ConsoleColorLogger ...
    On my current project, we have a 'build.bat' which invokes NAnt, so I just added the option there.
Once you have this in place, you should start seeing colors when a warning or error occurs. Feel free to use this sample build script to test it out (remember to invoke NAnt with -debug in order to see the debug-level messages!).
Customizing the colors
Simply specify additional properties when you invoke NAnt like this:
nant -logger:NAnt.Core.ConsoleColorLogger -D:ConsoleColorLogger.error=DarkRed -D:ConsoleColorLogger.warning=DarkMagenta ...
The levels you can customize are one of error/warning/info/verbose/debug. The colors you can use are 'default' (which means to use the foreground color you had before invoking NAnt) or one of these.
Hope that helps!

Wednesday, August 16, 2006

Why visitor pattern is worth the overhead

I've observed that many developers tend to shy away from the visitor pattern. I suspect it's because even though they understand the pattern, the double-dispatch and the seemingly out-of-place accept methods seem like too much overhead. So, instead of using visitor, we end up with logic that switches on a simple enumeration or the type of an object. Compared to visitor, this kind of code is arguably simpler to understand.

I think that visitors are worth the overhead. What we gain is the ability to easily identify the effects of type changes.

Let's use this example: One part of our application captures user feedback. They have two options:
  • Choose a feedback from a standard list (eg. "Good" or "Bad")
  • Submit a short sentence describing their usage experience.


// C# pseudocode...

abstract class Feedback
{
    void Accept(IFeedbackVisitor visitor);
}

class StandardChoiceFeedback : Feedback
{
    int Code;
    string Description;
    void Accept(IFeedbackVisitor visitor) { visitor.Visit(this); }
}

class FreeFormFeedback : Feedback
{
    string Text;
    void Accept(IFeedbackVisitor visitor) { visitor.Visit(this); }
}

interface IFeedbackVisitor
{
    void Visit(StandardChoiceFeedback feedback);
    void Visit(FreeFormFeedback feedback);
}


Somewhere in the system, we display a grid of data, where each row corresponds to a user and one of the columns shows their feedback:

class FeedbackColumnRenderer : IFeedbackVisitor
{
    string RenderedText;

    void Visit(StandardChoiceFeedback feedback)
    {
        RenderedText = feedback.Description;
    }

    void Visit(FreeFormFeedback feedback)
    {
        RenderedText = feedback.Text;
    }
}

string RenderFeedbackColumn(Feedback feedback)
{
    FeedbackColumnRenderer renderer = new FeedbackColumnRenderer();
    feedback.Accept(renderer);
    return renderer.RenderedText;
}


So far, all we've shown is the overhead incurred by using visitor.

However, what happens when the requirements change? For example, our business analyst comes back in 3 weeks to inform us that on top of the two feedback options, there needs to be another option — the user can choose to leave their phone number so that a customer representative can give them a follow-up call to chat about their experience. We are asked to implement this change in the UI and the persistence layer.

Our core types change like this:

class FollowUpCallFeedback : Feedback
{
    PhoneNumber phoneNumber;
    void Accept(IFeedbackVisitor visitor) { visitor.Visit(this); }
}

interface IFeedbackVisitor
{
    void Visit(StandardChoiceFeedback feedback);
    void Visit(FreeFormFeedback feedback);
    void Visit(FollowUpCallFeedback feedback);
}


With just these changes, let's re-compile. What we find is that compilation isn't successful because all implementors of IFeedbackVisitor now have to implement the new Visit(FollowUpCallFeedback) method. On further examination of the compiler errors, we discover that not only are there feedback visitors in the UI and persistence layers, but there is also one used for an obscure report. We talk to our business analyst again, and find out that this report has been missed in talking about the change. Great! We then talk about what the report should look like when a phone number is involved.

I think this illustrates the power of the pattern. When something changes in our type hierarchy, we are actually forced to address all the places which will be affected up-front. If we had chosen to use a simple enumeration or type switching scheme instead and we are not extremely careful, we might not discover all the places that are affected by the requirements change until much later (for instance, when the testers [or worse, the users] visually inspect that particular report).

Saturday, July 29, 2006

Why closure methods on collections matter

I like the new closure methods (like ForEach and ConvertAll) on .NET 2.0 classes such as List<T> and Array, because from an OO standpoint, it really should be the responsibility of a collection to know how to traverse its own elements. However, I've always had a tough time justifying why you'd want to do...

employees.ForEach(delegate(Employee e) 
{
    Console.WriteLine(e);
});


... instead of...

foreach (Employee e in employees)
{
    Console.WriteLine(e);
}


In this case, it doesn't look like you gain anything.

Recently, I came across a situation which made me see the difference more clearly. Let's say you have a list of employees, and now, you want to remove all managers. Happily, we write...

foreach (Employee e in employees) 
{ 
    if (employee.Manager)
    {
        employees.Remove(e);
    }
}


This causes an exception because you can't modify a collection while you're iterating through it. OK, how about...

for (int i = 0; i < employees.Count; i++) 
{
    if (employees[i].Manager)
    {
        employees.RemoveAt(i);
    }
}


This doesn't throw an exception, but also doesn't work properly because we're modifying the count in the loop and our index will skip over elements. OK, so the solution is...

for (int i = employees.Count - 1; i >= 0; i--) 
{
    if (employees[i].Manager)
    {
        employees.RemoveAt(i);
    }
}


That's great! However, we now have to worry about remembering that a forward loop through a collection to conditionally remove elements semantically doesn't work. If you forget, no exception will be thrown, and only running unit tests or executing the program will reveal this.

On the other hand, we wouldn't have to remember this little gotcha if we simply relied on the RemoveAll method...

employees.RemoveAll(delegate(Employee e) { return e.Manager; });


In a way, this situation is similar to why we don't hesitate to use the Sort(IComparer) or Sort(Comparison<T>) methods, versus getting the elements and writing our own sorting algorithm. Do we have to care how the collection's sort works? Generally, no, since that's the responsibility of the collection.

FYI, check out the List<T>.RemoveAll method in .NET Reflector. It's not using a reverse for-loop.